GIMP
News
Docs
Tutorials
More
This article was originally published in Linux Magazine, January 2002.
Editor’s note: since this tutorial was published, the old GIMP Script-Fu interpreter (SIOD) has been replaced by a newer and better one (TinyScheme). A Script-Fu migration guide is available.
Unix (and by association, GNU/Linux) provides the user with an environment full of possibilities. To turn these possibilities into reality, a Unix user must be technical in two senses of the word. Of course, he must understand technology, but to really shine, he must understand and even appreciate good technique.
Unix is filled with tools that, through an unspoken yet common understanding of the Unix Philosophy, work well with each other. To the creative user who can interconnect and combine these powerful tools, Unix can be very rewarding.
With that in mind, welcome to our Power Tools column. Our goal here is to help you discover different ways to get the most out of all the useful software that is out there, and to demonstrate how powerful these tools can really be in the hands of a skillful and technical user.
We begin this month with a look at GIMP. One of GIMP’s strong points has always been its scriptability. In fact, it’s widely acknowledged to be one of the cooler features of GIMP. But when it comes right down to it, there really are not that many people who can honestly say, “I know Script-Fu.”
Part of the problem is Scheme, the language used to write scripts for GIMP. It is a Lisp-like language that looks funny compared to most mainstream languages, and that’s enough to dissuade a lot of people from trying it. For anyone who really wants to learn Scheme, though, GIMP is a good place to start, because you’ll be able to achieve useful results relatively quickly due to the richness of its programming interface. Sometimes it’s a little too rich, though.
The other problem is that the API for GIMP can seem overwhelmingly large at times. Fortunately, there’s a way to break down this formidable API into something that is actually comprehensible by mere mortals. But we’ll get to that in a minute. First, let’s take a look at a very small subset of Scheme.
Scheme has a simple and uniform syntax compared to most other languages, but there’s still no way to properly explain it in this limited space. With that in mind, we’ll cover the bare minimum of Scheme that you’ll need to get started with GIMP scripting. Fortunately, it’s true that a little knowledge can go a long way, so if you don’t know Scheme, read on.
The first thing people notice when they look at Scheme is all the nested parentheses. Whatever you do, don’t panic. There’s a very simple concept behind this, and chances are good that you already understand it. Semantically, it’s not that different from HTML. For example, the following:
<ul><li><b>bold</b></li><li><i>italic</i></li></ul>
would look like this in Scheme:
(ul (li (b "bold"))(li (i "italic")))
Each matching pair of parentheses forms what is called an s-expression. The “s” stands for “symbolic,” because s-expressions usually contain symbolic information (like function and variable names) inside them. Literal information (like strings or numbers) is represented in the usual way — numbers are written in decimal notation, and strings are surrounded by a set of double quotes, like “bold” is in the example. An s-expression can also contain other s-expressions nested within it, making it a good notation for storing data as well as writing code.
When you are using s-expressions to represent code, the first item represents the function you want to use, and everything after it is considered a parameter of the function. What surprises many people is that in Scheme, nearly everything is done with a function. Even for basic math, what would be:
5 + 9 / 3
in most other languages is expressed in Scheme as:
(+ 5 (/ 9 3))
This may take a little getting used to. First, the order of things may look strange. If you’re used to “infix notation” (i.e., the way the first equation is written — with the operands being separated by the operators), then training yourself to use “prefix notation” (the way the second equation is written — with the operators placed before the operands) might take a little practice. Don’t worry — it’s not as unsettling as it looks once you get the hang of it.
Beyond our simple arithmetic example above, there are two functions in Scheme that you will need to know to help you understand the latter half of this article.
set!: This is the equivalent of the = (or assignment) operator which is seen in most other languages. Its purpose is simply to assign a given value to a particular variable. For example, the following assigns 5 to the variable a and the list of numbers (1 2 3) to b.
(set! a 5)<
(set! b '(1 2 3))
Note that the single-quote before the (1 2 3) is very important. It tells Scheme that the following s-expression is actually data and not code. Without the single-quote, the Scheme interpreter would have tried to treat the 1 as a function and failed miserably.
car: An s-expression is a list of things, but this is no ordinary list. In Scheme, lists are composed of only two things — a head, which is the first item in the list, and a tail, which is everything else (and which is also a list).
car is the function used to grab the head of a list. For example, (car ‘(3 2 1)) returns 3. This is very useful, because functions in the GIMP API almost always return lists; even when only one thing is returned, it’s returned in a one-element list, so it’s necessary to know this basic list operation.
This is barely a scratch on the surface of what Scheme provides, but it’s enough for now. There are already many good Scheme tutorials out there anyway, so why not make the most of them? You can take a look at Resources for more information.
Now that we know a little Scheme, we can start taking a look at how it is applied to GIMP.
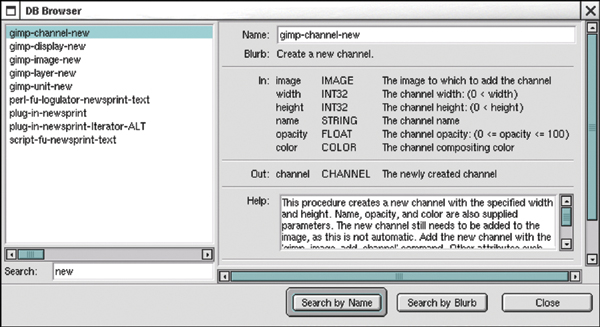
The easiest way to do this is to use the Procedure Browser, which is available under (Xtns→Procedure Browser). As you can see, GIMP has literally hundreds of Scheme functions tied directly to its internal API.
Although each function is documented, the sheer number of them can be overwhelming. Fortunately, there’s a nice trick to learning this API.
In the Procedure Browser, type the word “new” into the text input box in the bottom left corner and then click on the Search by Name button. The list should be much smaller now; the first five functions happen to be especially interesting. This search is demonstrated in Figure One below

These five functions are constructors for the five objects that the entire GIMP API revolves around. If you can understand exactly what each of these objects represents, then you are well on your way to being able to script GIMP.
Let’s get started by instantiating some of these objects. Be sure to get a Script-Fu console from (Xtns → Script-Fu → Console) so that there is a place for you to type in Scheme code. Now, let’s start by following along with Listing One.
  ; create an image
  (set! image (car (gimp-image-new 320 240 RGB)))

  ; images need layers
  (set! layer
     (car
        (gimp-layer-new
           image 320 240 RGB_IMAGE "layer"  100.0 0)))
  (gimp-image-add-layer image layer -1)

; display our image
(set! window (car (gimp-display-new image)))
(gimp-edit-clear layer)

; let's draw
(set! points (cons-array 4 'double))
(aset points 0 0)   ; (x0, y0)
(aset points 1 0)
(aset points 2 320) ; (x1, y1)
(aset points 3 240)
(gimp-palette-set-foreground '(255 0 0))
(gimp-paintbrush-default layer 4 points)
Image: The most important object in GIMP is the Image object, without which there would be no “I” in “GIMP.” On line 2, a 320x240 pixel, RGB image is instantiated and assigned to image.
GIMP has an abstract concept of what an Image object is. Aside from having properties like width and height, an image can be thought of as a collection of Layer objects.
Layer: Layers are very important because without them, there would be nothing to draw on. On lines 5 through 9, a Layer object is instantiated and then layer is added to image.
Channel: The purpose of channels is to provide a selective view of the coloration of an image. For instance, all RGB images come with a red, green, and blue channel.
If you wanted to affect only the “blueness” of an image, you could disable the red and green channels and only draw on the blue channel. It’s a useful but rather advanced concept, so we’ll skip this one for now.
Display: Although not strictly required, it would be nice to be able to watch our image as graphics are being drawn on it. To do this, a Display object is opened on line 12. Our layer might be filled with garbage, so it’s a good idea to use the gimp-edit-clear function to ensure that we start with a clean slate. (Hopefully, the layer constructor will behave more consistently in the future.) Note that as you write Scheme code into the Script-Fu Console, changes in the image will show up interactively.
Drawable: In C++ terminology, a Drawable would be an abstract base class which Layer and Channel are subclasses of. As the name implies, drawables are anything that can be drawn on. For example, one can draw on channels to perform advanced color effects. But for now we’ll just stick to drawing on a layer.
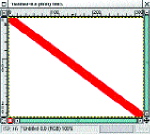
There are many, many functions in the GIMP API for manipulating drawables. On lines 16 to 22, gimp-paintbrush-default is used to draw a line on layer. Since this function needs an array of (x,y) coordinates, the cons-array function is used to allocate an array of doubles and the aset function is used to fill it with values. Before the line is drawn, we change our default foreground color to a bright red using gimp-palette-set-foreground. If you’ve typed everything in correctly, you should have something that looks like Figure Two showed below.

Now that we have a foundation of knowledge to work from, we can move on to more interesting topics. Study Scheme and GIMP on your own. See Resources for good places to start your self-education.
This article was originally published in Linux Magazine, January 2002. It has since then seen some minor updates.